f-log

just another web log

30 Jun 2020:
get blender a script of expressions
And now for something completely different

I created a handy script for downloading the latest version of Blender for Linux
getBlender.sh

It has some interesting bits, so lets dive in to the code
# Download the latest version of Blender for linux if not already in folder
# 2020-06-29
baseUrl=https://download.blender.org/release/

latest=$( curl -s $baseUrl \
| egrep "^<a" \
| sed -re 's/^[^"]+"([^"]+)">[^>]+>\s+([^-]+)-([^-]+)-([0-9]+).+/\4-\3-\2 \1/' \
-e 's/-Jan-/-01-/' \
-e 's/-Feb-/-02-/' \
-e 's/-Mar-/-03-/' \
-e 's/-Apr-/-04-/' \
-e 's/-May-/-05-/' \
-e 's/-Jun-/-06-/' \
-e 's/-Jul-/-07-/' \
-e 's/-Aug-/-08-/' \
-e 's/-Sep-/-09-/' \
-e 's/-Oct-/-10-/' \
-e 's/-Nov-/-11-/' \
-e 's/-Dec-/-12-/' \
| sort -n | tail -n 1 \
| sed -re 's/\S+\s(.+)/\1/' )

latestUrl="$baseUrl$latest"

echo looking in $latestUrl

latest=$( curl -s $latestUrl \
| egrep "^<a" \
| egrep -i "linux" \
| sed -re 's/^[^"]+"([^"]+)">[^>]+>\s+([^-]+)-([^-]+)-([0-9]+).+/\4-\3-\2 \1/' \
-e 's/-Jan-/-01-/' \
-e 's/-Feb-/-02-/' \
-e 's/-Mar-/-03-/' \
-e 's/-Apr-/-04-/' \
-e 's/-May-/-05-/' \
-e 's/-Jun-/-06-/' \
-e 's/-Jul-/-07-/' \
-e 's/-Aug-/-08-/' \
-e 's/-Sep-/-09-/' \
-e 's/-Oct-/-10-/' \
-e 's/-Nov-/-11-/' \
-e 's/-Dec-/-12-/' \
| sort -n | tail -n 1 \
| sed -re 's/\S+\s(.+)/\1/' )

latestUrl="$latestUrl$latest"

echo looking at $latestUrl

if [ ! -f "$latest" ]; then
&nbsp;&nbsp;&nbsp;&nbsp;wget "$latestUrl"
&nbsp;&nbsp;&nbsp;&nbsp;echo "You probably want to do the following now"
&nbsp;&nbsp;&nbsp;&nbsp;echo "tar xvf $latest"
&nbsp;&nbsp;&nbsp;&nbsp;blender=$(echo $latest | sed -re 's/\.tar.+$//')
&nbsp;&nbsp;&nbsp;&nbsp;current=$(pwd)
&nbsp;&nbsp;&nbsp;&nbsp;echo "ln -sf ${current}/${blender}/blender /usr/bin/blender"
else
&nbsp;&nbsp;&nbsp;&nbsp;echo "Congratulations! you already have what I have deemed to be the latest version of Blender for Linux"
&nbsp;&nbsp;&nbsp;&nbsp;ls -l --color=always /usr/bin/blender
fi


First off we use curl to download the directory listing silently -s.

Then we pipe that output into egrep to filter the links.

This gets piped to the mega sed. -r uses extended regex, just always include it. Then -e defines an expression.

^[^"]+" matches the beginning of a line ^ followed by any character that is not a " at least once, followed by a "
([^"]+) create a capture group and get anything that is not a " at least once, followed by a "
>[^>]+>\s+ matches anything but a > at least once followed by a > and then a space character a \s at least once
([^-]+)-([^-]+)-([0-9]+).+ creates three more capture groups matching groups of non - characters separated by a -. Also capturing the digits 0 to 9 [0-9]. Because this is a substitution expression we then just match anything else on the line .+
\4-\3-\2 \1 outputs our capture groups YEAR-MON-DY FOLDERNAME

Then we add on twelve further expressions, each converting a three letter month name into it's numerical value. This allows the results to be sorted in numerical value sort -n and we take the last item as the newest tail -n 1.
Finally we do another sed expression \S+\s(.+) which matches any non space character \S at least once followed by a space character \s and captures the remaining characters .+. The capture group is all that remains.

Combine the new folder name with the base url to get the new url we need to target.

Do exactly the same mega sed but include an extra egrep to just get links with linux in the name.

Check to see if the file has not already been downloaded if [ ! -f "$latest" ]; then, download it with wget.

Then display the commands to untar the archive into it's own folder and link the blender command to the new installed version ln. -sf is force -f replace existing link and do a soft link -s not a hard link. Just never do hard links.

If the file already exists show where the blender command currently links to.
30 Jun 2020:
wire whips 666 pi into shape
The biggest problem I encountered while soldering, was the iron's tip not melting the solder. I held it in the right place for ages and sometimes eventually it would work, sort of. At the first sign of the tip not melting the solder you need to stop and clean the tip. I have no wire-wool as in the videos, instead my iron has some weird tip cleaning cream bolted on to the the stand.

Once I go the hang of always cleaning the tip and "tinning" it with solder I made a reasonable job of re-doing the few bad connections. I also had taken delivery of some de-soldering wick. A thin strip of braided copper, that magically sucks up solder when you push the soldering iron against it and the solder.

Gert VGA 666 board soldered board, very messy

I used a multi-meter to check each of the connections I could see in the schematics and found three that did not make sense. I expected to find bad solder joints that did not conduct electricity, but what I found was board traces that did not connect. The fix was to solder wires to bridge the gaps. I checked with my spare board that these connections really were damaged and required before adding the extra wires.

Gert VGA 666 board with help wires

Now all the solder joins looked half reasonable and all the traces I could check showed connectivity. Good thing this is a simple board.

Plug in the board to my trusty Pi B+ 1.2 and ...

nothing.

Two different VGA monitors both say "No signal" :(

Time to check the config. Just a quick ssh connection to the Pi and ...

kex_exchange_identification: read: Connection reset by peer

Tried a few things, no change. Internet was unhelpful, as that message can mean just about anything. Tried ssh client from my phone with no luck then I noticed the ACTivity LED was flashing...

Raspberry pi B+ 1.2 showing SD card popped out by accident

This pop-out SD card design was short lived. I have lost so much time over the years when it incidentally popped out of a headless setup.

The default config.txt has lots of helpful comments, but this makes it a pain to identify what is and is not set.

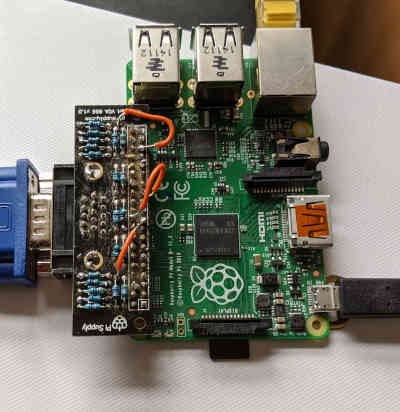
egrep -v "^#" /boot/config.txt | egrep -v "^$"
(excludes all the lines starting the # character and then filters out blank lines)

hdmi_force_hotplug=1
hdmi_group=2
hdmi_mode=4
dtparam=i2c_arm=off
dtparam=spi=off
dtparam=audio=on
[pi4]
dtoverlay=vc4-fkms-v3d
max_framebuffers=2
[all]
dtoverlay=vga666
enable_dpi_lcd=1
display_default_lcd=1


oops hdmi_group, hdmi_mode does not sound right for VGA. Oh, they are supposed to be dpi_group, dpi_mode

hdmi_force_hotplug=1
dpi_group=2
dpi_mode=4
dtparam=i2c_arm=off
dtparam=spi=off
dtparam=audio=on
[pi4]
dtoverlay=vc4-fkms-v3d
max_framebuffers=2
[all]
dtoverlay=vga666
enable_dpi_lcd=1
display_default_lcd=1


Still nothing on the monitors. I need help.

I found an extra link on the Pi Supply website entitled gert-vga-666-assembly-tips-and-gotchas. Which sounds ideal.

Apart from some soldering advice that counters what I read in the documentation, there was an example config.txt

#hdmi_force_hotplug=1
dpi_group=2
dpi_mode=9


and rebooting now gets me a very ugly green and purple desktop

Raspberry Pi OS on VGA monitor with really bad colours

trying
dpi_group=2
dpi_mode=4


again resulted in ... nothing

What's this? another secret document. Raspberry Pi DPI README.md

dpi_group=2
dpi_mode=5


Yes! 640x480

Time to get the SV-3 glasses out of mothballs.

to find the battery was dead :(
(and I had to dig to find the special SONY battery charger)
27 Jun 2020:
installing is easy for bad pi solderer
Level of stupidity exceeds current maximum :(

After soldering my Gert VGA 666 and a pin header to a non-Wifi Pi Zero, I wanted a fresh install of the Desktop/GUI Raspbian (now known as Raspberry Pi OS). Went to the download page, and scrolled past NOOBS until I found "Raspberry Pi Desktop" (not reading any of the surrounding text).
dd bs=4M if=rpd_x86_latest of=/dev/sdd status=progress conv=fsync
and the Pi did not boot, didn't even flash the ACT-ivity LED.
tried a more thorough dd
dd bs=1M if=rpd_x86_latest of=/dev/sdd status=progress conv=fsync
same result.

Had I blown up the Pi with bad soldering?
Tried another card and it worked, so not short circuited.

Have you noticed the mistake yet?

That's right, I download the special image for virtual machines on the X86 platform, Raspberry Pis are ARM based.

So back to download page and got the ARM version (Minimal but with GUI) and then tried to write that.
dd bs=4M if=raspios_armhf_latest of=/dev/sdd status=progress conv=fsync

Weird, there is no progress ... Oh!

The download name does not include an extension...

unzip -p raspios_armhf_latest | dd bs=4M of=/dev/sdd status=progress conv=fsync

Right, now I can finally boot the Pi Zero.

Just to be extra annoying the USB un-powered hub is not working with my keyboard and mouse, even though it worked fine with the Joggler.

So just keyboard after removing hub (remember the Pi Zero has only a single USB port).

Run raspi-config disable SPI and I2C interfaces, set screen resolution to 640x480, then do not reboot but edit
sudo vi /boot/config.txt
and add the required lines at the end
dtoverlay=vga666
enable_dpi_lcd=1
display_default_lcd=1


Shutdown the Pi and plug in the Gert VGA 666 board and a VGA monitor.

and nothing ... switching back to HDMI showed the rainbow, which just indicates HDMI is connected (and deliberately not sending images from terminal or X).

Then I noticed I had not soldered the large fixing points each side of the VGA connector. They are only for stability, are they not?

No! on the schematic they are connected to multiple pins. Doh! Time to get all the soldering kit out again, and I had put it away very thoroughly (not done much soldering for a few years).

Had a look at the other solder joints again and found a few wanting. The Header pins had created an impenetrable forest, so I decide to Dremel the pins off. This created a fun new problem. The Dremel not only cut off the unwanted pins but atomised any solder that was on said pins.

The board looks a right mess and I cannot clean it off :(

More importantly, I cannot see the contact pads. Usually you can see the shine and know there is not enough solder there.

This board was only £6 and I bought two of them. Not sure if I should try and fix this one or scrap it.

Did watch a load of "How to solder" YouTube videos and I think I understand why I am so bad at soldering.
27 Jun 2020:
jog on to pi4 pihub pimote and sv-3
Where were all my power sockets going?

One was my new-ish Pi4 running my "worst Node code ever" slide-show project. I found the Pihub (now discontinued) was powering my toilet roll camera which if you remember also activates my pimote lights. It had a number of free USB sockets (it was just being used for power) and I plugged in the Pi4, booted up, tried to use the slide-show... Got the default images, it was not reading from the USB drive. Disconnected and reconnected the drive, no errors but it was not getting mounted.
Tried another USB drive, not getting mounted. Now I am worried. Is the PiHub not providing enough current?

Then I remembered I had not rebooted the Pi4 since setting it up and I had set it up with an HDMI monitor connected... Now I know SystemD is bad, but to only be able to auto-mount when the GUI is running?

The fix was to force the Pi into driving the GUI by changing the monitor settings in raspi-config from Default to anything else and rebooting.
This has the minor side effect of wasting resources on an unneeded GUI, but it did work.

Talking about the PiMote, I finally got the replacement/additional cable from the people who created the PiHub and then I bought a couple of Gert VGA 666 boards at only £6 each to try and resurrect my SV-3 project.

Joggler joy, currently put on hold ...
27 Jun 2020:
Juggling a Joggler into 2020
My son found the Joggler box and wanted to know what it was.

Joggler box white background

I explained it was a screen with a mini computer. As I described it to him, I wondered if it still worked. Previously

So I downloaded the latest image (2016), wrote it to a USB thumb drive and plugged it in and it booted without issue. I remembered to connect it via a USB hub so I could use a keyboard and mouse. Then I enabled Wi-Fi and sshd.

Updated it with the usual
sudo apt-get update
sudo apt-get upgrade


and after a while it rebooted, which was a bit worrying, but when it came back up X was working fine and I could install xscreensaver 5.15 and all its extras
sudo apt-get install xscreensaver xscreensaver-data xscreensaver-data-extra xscreensaver-gl xscreensaver-gl-extra


then run it and there is my screen-saver and any of the other cool hacks including all the 3D ones. No stutter or slow down, very cool!

Here you can see it booting to Xubuntu, showing the desktop, my screensaver and the random 3D hack that happened to be running when I took the picture

4 images of the O2 Joggler. Booting Xubuntu, desktop, xscreensaver, saver running

This test of the Joggler was in the middle of the room so I shut it down and started looking for a permanent location. There were a number of power sockets but they were all in use.

Then everything changed tact, somewhat ...
13 Jun 2020:
alyx conducting vr bone in inner ear exporation
I have some issues with my ears.
I can manage;
2 minutes - In-ear head-phones/pods
15 minutes - Holding a phone to my ear
30 minutes - Sony Walkman style head-phones(simply bent wire with foam covered speakers)
45 minutes - Large over-the-ear head-phones
60 minutes - Clip over-the-ear head-phones

And the "Clip over-the-ear head-phones" were what I was using with the HTC Vive VR headset.

But not anymore. I have been using AfterShokz Air Bone Conducting Headphones. I have tested wearing them for 3 hours and had no problems.

They do take a little getting used to, but after testing them with music I tried Half Life:Aylx

<silence type="stunned">

They worked soooo well and I was completely immersed in the world of Half Life:Aylx

It is a pity that it is such a time consuming pain to setup the VR(and take it down) every time :(

I love the way the game switches gear from exploration, hunting, puzzle solving to gun battles, story progression and even boss fights. There is still so much here. No where near finished it!
07 Jun 2020:
normal service blah blah
Time to move the office around and set up VR again for some Half Life:Aylx !
07 Jun 2020:
g sweet api example archives a perfectly good report
At work I have a weekly report that is generated on our Database hosting service via a bash script from cron

#!/bin/bash
# Creates and emails Moodle user reports
# uses ~/.my.cnf for SQL access

DATE=$(date +"%Y-%m-%d")

# Never logged in
FN="/..../reports/moodle_user_never_logged_in-$DATE.txt"
SQL="/..../dbscripts/moodle_user_never_logged_in.sql"
EMAIL="example@example.com"
SUBJECT="Moodle User report - never logged in $DATE"
#echo $DATE
#echo $FN
#echo $SQL
if [ ! -e "$FN" ]; then
# echo "Creating report $SUBJECT"
mysql -t -u dbUSER --host dbHOST dbINST < $SQL > $FN                                
RES=$( cat $FN | wc -l )
echo "Total $(($RES-4))" >> $FN
mail -s "$SUBJECT" $EMAIL < $FN
else
echo "File already exists for $SUBJECT"
fi


This gets emailed to me and I then dutifully copy it into a Google Docs document. This process consists of a number of steps.

Copy the body of the email
Create new Google Doc file on a Shared Drive in the reports folder
Name the file - including the date
Paste in the body
Select all the text and set font to "Courier New" and font size 8
Set page settings to Landscape and all the Margins to 0
Archive the email

It takes less than a minute, but it still feels very automatic and ripe for automation.

I have committed to a Google automation project for the business in the near future and thought it would be a good test-bed on the how easy it would be.

WELCOME TO THE RABBIT HOLE

I decided to break the task up into GMail stuff and Google Docs bits

In WSL

sudo apt update && sudo apt upgrade -y
sudo apt install python3 python3-pip
pip3 install --upgrade pip
pip3 install --upgrade google-api-python-client google-auth-httplib2 google-auth-oauthlib

wget https://github.com/gsuitedevs/python-samples/raw/master/gmail/quickstart/quickstart.py


First off the quick start python code worked well, this led to a false sense of security. More on that later.
https://developers.google.com/gmail/api/quickstart/python

It correctly read the labels in my GMail account after I did the OAuth dance.

What I wanted was the latest email that matched a specific "from" email address.

Just set the "query" parameter and index 0 in the resulting list is the latest. Easy!
user_id = "me";
    query = "from:example@example.com";
    response = service.users().messages().list(userId=user_id, q=query).execute()


To get at the meat of the email was slightly confusing. Setting the format to "raw" got me everything, but it was a non-contextual mess.

Using format "full" then required a bit of work to get the "body" and the "subject"

message = service.users().messages().get(userId=user_id, id=msg_id, format='full').execute()

#msg_str = base64.urlsafe_b64decode(message['raw'].encode('ASCII')) # when format was 'raw'
#print(msg_str)
print(base64.urlsafe_b64decode(message['payload']['body']['data'].encode('ASCII')) )
messageHeaders = message['payload']['headers']
subject= [i['value'] for i in messageHeaders if i["name"]=="Subject"]
print(subject)

        
Apparently I could have imported the Python "email" module and made it a little easier, but as I needed nothing else I consider this all a success!

FYI: I did notice the body was base64 encoded. It had an "=" at the end of a long Alpha-numeric string, which looks like a Hexadecimal but has all 26 letters of the alphabet and few other characters.
https://en.wikipedia.org/wiki/Base64

Here is the complete GMail test program

from __future__ import print_function
import pickle
import os.path
import base64
from googleapiclient.discovery import build
from google_auth_oauthlib.flow import InstalledAppFlow
from google.auth.transport.requests import Request
from apiclient import errors

# If modifying these scopes, delete the file token.pickle.
SCOPES = ['https://www.googleapis.com/auth/gmail.readonly']

def printMessage(service, msg_id):
    user_id = "me";
    try:
        message = service.users().messages().get(userId=user_id, id=msg_id,
                                             format='full').execute()

        #msg_str = base64.urlsafe_b64decode(message['raw'].encode('ASCII')) # when format was 'raw'
        #print(msg_str)
        print(base64.urlsafe_b64decode(message['payload']['body']['data'].encode('ASCII')) )
        messageHeaders = message['payload']['headers']
        subject= [i['value'] for i in messageHeaders if i["name"]=="Subject"]
        print(subject)

    except errors.HttpError as error:
        print ('An error occurred: {0}'.format(error))

def getMessages(service):
    user_id = "me"
    query = "from:example@example.com" # specific to my requirements
    try:
        response = service.users().messages().list(userId=user_id,
                                             q=query).execute()
        messages = []
        if 'messages' in response:
         messages.extend(response['messages'])

        while 'nextPageToken' in response:
         page_token = response['nextPageToken']
         response = service.users().messages().list(userId=user_id, q=query,
                                         pageToken=page_token).execute()
         messages.extend(response['messages'])

        return messages
    except errors.HttpError as error:
        print ('An error occurred: {0}'.format(error))

def main():
    """Searches for specific email.
    Lists the messages contents.
    """
    creds = None
    # The file token.pickle stores the user's access and refresh tokens, and is
    # created automatically when the authorization flow completes for the first
    # time.
    if os.path.exists('token.pickle'):
        with open('token.pickle', 'rb') as token:
            creds = pickle.load(token)
    # If there are no (valid) credentials available, let the user log in.
    if not creds or not creds.valid:
        if creds and creds.expired and creds.refresh_token:
            creds.refresh(Request())
        else:
            flow = InstalledAppFlow.from_client_secrets_file(
                'credentials.json', SCOPES)
            creds = flow.run_local_server(port=0)
        # Save the credentials for the next run
        with open('token.pickle', 'wb') as token:
            pickle.dump(creds, token)

    service = build('gmail', 'v1', credentials=creds)

    results = getMessages(service)

    print("Number of Messages found {0}".format(len(results)))
    #for message in results:
    #    print(message['id'])

    printMessage(service, results[0]['id'])

if __name__ == '__main__':
    main()


A quick note about the two other files you need to make this code work.
"credentials.json" Is generated by the quick-start "Enable the GMail API" button
"token.pickle" is created during the OAuth process and must be deleted(to be recreated) if you change the SCOPES. Which was required in the Google Docs test program.

So then the Google Docs code should be just as easy?

Started off well with another quick-start
https://developers.google.com/docs/api/quickstart/python

wget https://raw.githubusercontent.com/gsuitedevs/python-samples/master/docs/quickstart/quickstart.py

This gets the title information of an example document. Which worked, but left a lot of questions, where is this document? what is the security on it? does this mean anyone can access any document with just the id? and how can I read MY documents title?

Ignoring all that for another day, I needed a new Document to store my report in. This bit was easy.

title = 'My Document'
body = {
    'title': title
}
doc = service.documents().create(body=body).execute()
print('Created document with title: {0}'.format(doc.get('title')))
DOCUMENT_ID = doc.get('documentId')

# Retrieve the documents contents from the Docs service.
document = service.documents().get(documentId=DOCUMENT_ID).execute()

print('The title of the document is: {}'.format(document.get('title')))


The code then replicates getting the title information to make sure it really is MY new Document.

So now all I need to do is insert the email message content. Except these are not files, but "live" documents. By which I mean each change is seen as an atomic instruction.

This make sense when a Document is being edited by different people at the same time, but not for this use-case.

The example of inserting text https://developers.google.com/docs/api/how-tos/move-text uses indexes of 25, 50, 75 which catches out a lot of people.

The index is the location in the document and as with other Docs API calls, it is referenced as 0 based. So that must mean to insert into a blank document you want and index of 0?

No, its 1. Lost a lot of time messing about with this. Although no one mentions it, I think the 0 is the root Body of the Document.

text1 = "the"
text2 = " quick"
text3 = " red"
requests = [
     {
        'insertText': {
            'location': {
                'index': 1,
            },
            'text': text1
        }
    },
             {
        'insertText': {
            'location': {
                'index': 1,
            },
            'text': text2
        }
    },
             {
        'insertText': {
            'location': {
                'index': 1,
            },
            'text': text3
        }
    },
]
result = service.documents().batchUpdate(documentId=DOCUMENT_ID, body={'requests': requests}).execute()


And that did not error and the three words were added to the Document. Only they came out in the wrong order.
" red quickthe"

What I needed to do was handle each "insertText" and as a separate edit in time. The correct instructions were

text1 = "the"
text2 = " quick"
text3 = " red"
requests = [
     {
        'insertText': {
            'location': {
                'index': 1,
            },
            'text': text1
        }
    },
             {
        'insertText': {
            'location': {
                'index': 1+ len(text1),
            },
            'text': text2
        }
    },
             {
        'insertText': {
            'location': {
                'index': 1+ len(text1) + len(text2),
            },
            'text': text3
        }
    },
]
result = service.documents().batchUpdate(documentId=DOCUMENT_ID, body={'requests': requests}).execute()

        
Which gave the expected

"the quick red"

Now swap the text for the email message. Error: expecting string. ... Erma, what?

Turns out the base64 code from earlier creates a binary stream not the expected string of "ASCII" text.
So after a bit of Googling I changed it to
msg_str = base64.urlsafe_b64decode(message['payload']['body']['data'].encode('UTF-8'))

but that did not help.
What I needed was "decode", thus

requests = [
         {
            'insertText': {
                'location': {
                    'index': 1,
                },
                'text': contents.decode()
            }
        }]


At this point all the text in the resulting report Document was all over the place. It was time to switch to Landscape and remove the margins.

Except there is no option in the API to switch to Landscape, but some bright spark realised you Can change the Document Width and Height
https://stackoverflow.com/questions/60324151/how-can-i-create-a-document-with-horizontal-page-orientation-using-google-doc-ap/60325013
and although their specific example code caused chaos, it did lead me to the right results.

This is the correct sizing for a UK A4 Document.

requests = [
...
        {
            'updateDocumentStyle': {
                "documentStyle":{
                    'pageSize':{
                        "width": {
                            'magnitude': 842,
                            'unit': 'PT'
                        },
                        "height": {
                            'magnitude': 595,
                            'unit': 'PT'
                        }
                    }
                },
                "fields": 'pageSize'}
        }]


Unit can only be "PT" even though the Docs GUI uses "cm" and "inches". Strangely, when the Document was opened and the Settings viewed, Orientation is set to Landscape. It must specifically check for known sizes in various orientations.
Not sure about the "fields" requirement, I already specified what I am updating!

Removing the Margins was a piece of cake

requests = [
...
        {
            'updateDocumentStyle': {
                "documentStyle":{
                    'pageSize':{
                        "width": {
                            'magnitude': 842,
                            'unit': 'PT'
                        },
                        "height": {
                            'magnitude': 595,
                            'unit': 'PT'
                        }
                    },
                    'marginTop': {
                            'magnitude': 0,
                            'unit': 'PT'
                        },
                    'marginBottom': {
                            'magnitude': 0,
                            'unit': 'PT'
                        },
                    'marginLeft': {
                            'magnitude': 0,
                            'unit': 'PT'
                        },
                    'marginRight': {
                            'magnitude': 0,
                            'unit': 'PT'
                        }
                    },
                    "fields": 'pageSize, marginTop, marginBottom, marginLeft, marginRight'
                }
        }]


From the name I knew "fields" could contain multiple entries, but could find no examples. The documentation is incredibly complicated, I just wanted to know if it was comma separated!
https://developers.google.com/protocol-buffers/docs/reference/google.protobuf#google.protobuf.FieldMask
In the end I just guessed and it worked ;)

Now for the font. Browse API docs ... nothing called font, there is one for font size ... eventually find the reference to change the font is ...
"weightedFontFamily"
because ... of course.

I the meantime I tried changing all the text to Bold and there was a handy example from stackoverflow to copy and paste
https://stackoverflow.com/questions/57910316/how-to-bold-text-in-a-google-doc-using-the-google-docs-api

requests = [
...
    {
        'updateTextStyle': {
            'range': {
                'startIndex': 1,
                'endIndex': 5
            },
            'textStyle': {
                'bold': True,
            },
            'fields': 'bold'
        }
    },
]


And it worked! the first five characters were bolded.

Except when I tried using my message text I got an error about the index being to large
Invalid requests[0].updateTextStyle: Index 1399 must be less than the end index of the referenced segment, 1313."

Which was odd because I was using the length of the text I had inserted(which was 1399), so it had to be right!?

After a bit of to-ing and fro-ing, trying with and without ".decode()" and some other random character encoding props I remembered two things.
1: When dumping the email message body directly to the terminal I had seen lots of "\r\n" instances
2: The report ends with a record count and that count was 82

1399 - 82 = 1317

which is surprisingly close to 1313 ...
MySql creates the report with 4 extra lines
e.g.
+-----------+-------------------+--
| firstname | lastname         | C
+-----------+-------------------+--
| Rey     | Palpatine         |
| Fin     | Skywalker         |
+-----------+-------------------+--


So a quick

WINDOWS_LINE_ENDING = b'\r\n'
UNIX_LINE_ENDING = b'\n'

report_contents = message_contents.replace(WINDOWS_LINE_ENDING, UNIX_LINE_ENDING)


Got rid of 82+4 characters and
'endIndex': len( contents.decode() )

now worked.

Here is the request just for setting the font name to "Courier New" and size to 8pt

requests = [
...
    {
        'updateTextStyle': {
            'range': {
                'startIndex': 1,
                'endIndex': len( contents.decode() )
            },
            'textStyle': {
                'weightedFontFamily': { 'fontFamily' : 'Courier New'},
                'fontSize': {
                        'magnitude': 8,
                        'unit': 'PT'
                    }
            },
            'fields': 'fontSize, weightedFontFamily'
        }
    }]


So that's the end?

Not quite. We need to take this new(and perfectly formatted) Document and move it to the specific location on a Google Shared drive.

Check Google Drive documentation ... no "move" option. You "have" to copy and then delete the original, or a similar process.
https://developers.google.com/drive/api/v3/reference

Had a lot of problems with this part of the task as the documentation states the flag to include Shared Drives is being deprecated. Currently it defaults to False but when deprecated in a few weeks time it will default to True.

Forcing the flag allowed me to perform the actions on the Shared Drive.

As Google Doc files can have exactly the same name, I added a check and refusal to run if the current report already exists. During debugging that would not be an issue as I would manually delete the file. Only, the code reported the file existed even though I had deleted the file!

Except in Google land, I had not. I had simple flagged the file as "deleted", I needed to go and empty the Trash. In the end and with so many failed tests, I got in the habit of renaming the bad report "DELETE ME -".

result = service.files().copy(fileId=fileId, supportsAllDrives=True, body={'name': title, "parents": [folder] }).execute()
result = service.files().delete(fileId=fileId).execute()


Where "folder" is the folder on the Shared Drive I wanted the report to sit.

And finally we need to Archive the GMail message.

You cannot add a label "ARCHIVE" to a message and there are no methods to move to archive ...
The fix is to remove all labels, cos that's obvious?

https://developers.google.com/gmail/api/guides/filter_settings#actions

Easy

json returned "Insufficient Permission"
Oops still set on read only SCOPES

(delete token.pickle)
add scope
https://www.googleapis.com/auth/gmail.labels
because we want to change labels, right?
wrong
json returned "Insufficient Permission"

That scope changes labels in the global context. We need message modification scope

https://www.googleapis.com/auth/gmail.modify

def archiveMessage(service, msg_id):
    user_id = "me";
    msg_labels = { 'removeLabelIds' : ['INBOX']}
    service.users().messages().modify(userId=user_id, id=msg_id, body=msg_labels).execute()


And .... its gone! (in a good way)

Out of my GMail inbox and in to the Mailbox limbo land that all archived messages go to. I can still find it in a search.
07 Jun 2020:
emergency pi knobbles regular pc
Just did an emergency shutdown of my computer. Fan noise had been getting worse for a few days, but today it sounded like it was about to go POP. But after the power switched off the fan noise persisted. It wasn't this machine, but my Pi 4 that has a mini case fan.

The Pi 4 does do much at the moment so removing the lid and fan assembly should keep it cool enough just with basic heat sinks!
loading results, please wait loading animateloading animateloading animate
[More tags]
rss feed

email

root

flog archives


Disclaimer: This page is by me for me, if you are not me then please be aware of the following
I am not responsible for anything that works or does not work including files and pages made available at www.jumpstation.co.uk I am also not responsible for any information(or what you or others do with it) available at www.jumpstation.co.uk In fact I'm not responsible for anything ever, so there!