f-log

just another web log

25 Oct 2017:
USB x4 projected knives save the day
Raspberry Pi 3 HiRes
(so close)

[X]Board in Blender
-[X]Measure board
-[X]Model
-[X]Texture
-[X]Components on the bottom
-[ ]Components on the top
--[X]GPIO pins
--[X]Camera connector
--[X]Display connector (identical to the camera connector)
--[X]Broadcom chip
--[X]Other chip (networking and USB, I think)
--[X]USB power connector
--[X]HDMI connector
--[X]Headphone jack
--[X]Ethernet connector
--[X]USB connector pair x2 (making four)
--[ ]Micro components, like capacitors (loads of these)

This time I did not use the Bevel Modifier, I did use the Mirror Modifier and Solidify Modifier. To get the bevelled edges I bevelled each individually with CTRL + B

To get the triangular cuts I tried first the Knife Tool, which was good but a bit imprecise. When it came to getting the same cut through multiple layers I knew I needed something more robust. I added a new Plane with the faces deleted shaped as the cut I wanted, positioned it above the cut area and used the Knife Project tool.
That is Project as in Projector not Project as in ... projects :S

I made two mistakes here. First was to realign the camera after taking the first cut and expecting it to take the new cut in the same direction, when instead the cut occurred from the cameras new point of view! The second was to carefully select the faces I wanted affected by the cut and hide any others when I could have just enabled the Cut Through option.

It is a bit tricky to work out how to use Knife Project at first. You must select the open object (no faces) and then the target object (hold down SHIFT). Go in to Edit Mode and make sure the target areas of the object are selected. Then hit Knife Tool and optionally click the Tool option Cut Through.

renderings of raspberry pi circuit board highlighting the USB connectors

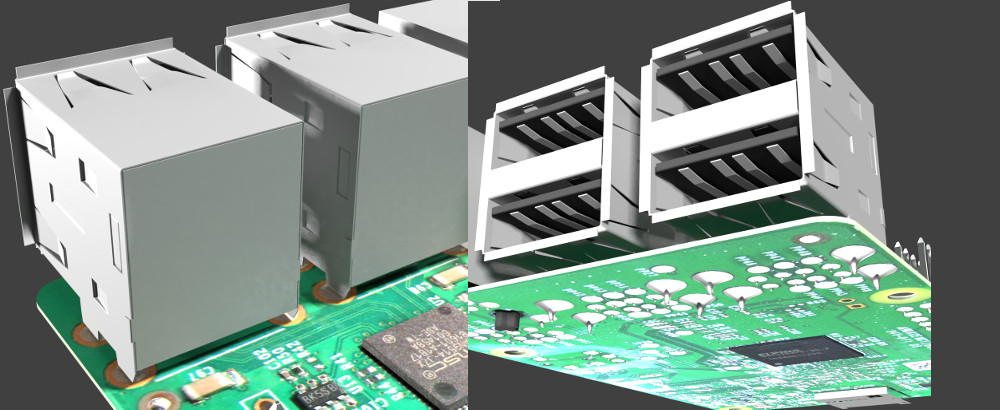
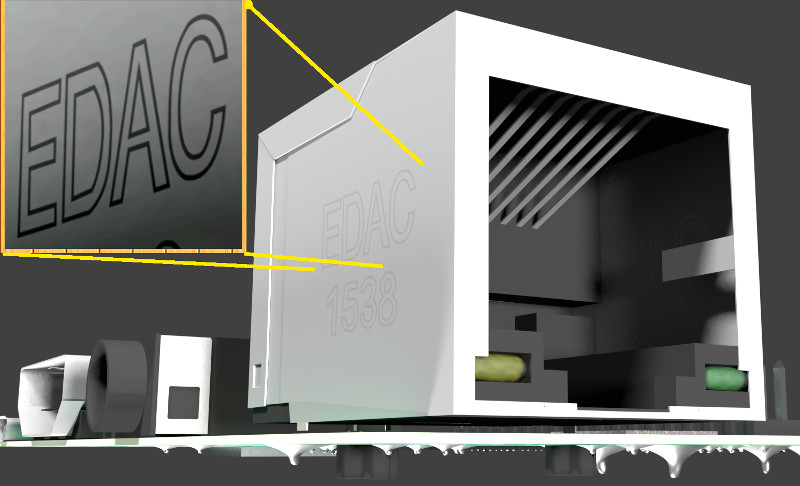
and yes, the USB pins are supposed to be in that odd pinched configuration.
18 Oct 2017:
what the star freestyle and dual scenes in vse
So what did I want with a star shape? Well I can not show you (yet) but it was for a homework video where Joe is talking about the weather and how hot it is.

This scene is made up of a thermometer that scrolls (and bounces), two sweat drops and a smiling Sun that creates a blank/fade out at the end of the scene.

The Thermometer is just a list of numbers created as Font objects and a triangle plane as a "here" marker. The text is different colours to show hot to cold. The sweat drops are timed to animate when Joe wipes his brow. They are created from a Mesh circle that has been "bent" using a Proportional Grab with a "highlight" squashed sphere added on top. The Sun is my Star object with a number of Mesh circles added on to make a face, eyes, eye-highlights and a mouth.

Nothing exciting so far. What I found was the Thermometer and the sweat drops did not look right, fading into the video. To fix this, I turned on Freestyle that draws a border on everything. The Thermometer and the drops now "popped" and looked awesome but the Sun which was made up of a lot more components looked awful.

What to do? I needed the Freestyle look to make the Thermometer and the sweat drops more visible but I could not have the Freestyle lines on the Sun, where it drew lines around each element and made a mess.

I had noticed that in the VSE (video editor) when adding a Scene (the rendering stuff in Blender that you could select a Scene (only ever had one before). So I tried something new (to me). I created a copy of my existing scene (Plus button at the top of the Blender window next to "Scene") and turned Freestyle off. Then I added the new Scene after the existing Scene in the VSE where it was overlaid on the video of Joe talking. Bit more messing about with timing and hiding stuff and the video plays with Joe in the background, the thermometer in the foreground with Freestyle lines then the animated sweat when Joe wipes his brow and finally the Sun (without any Freestyle lines) appears and grows until it covers the whole screen.

Once the video is completed I will upload it. It already has a Shape Key controlled animated globe and a Cloth with Wind flag flapping.
14 Oct 2017:
what nth select blender not checker deselect
I needed a Sun shape in Blender I had thought of crafting in Inkscape, but I wondered how easy it would be to create a mesh circle and scale every other vertex ...

Having created Blender Python scripts before (saltshaker) in the distant past, I expected a hard slog to find the required code. But Blender has Templates in the Text editor window and they cover almost any simple task you might require.

So it was a simple process of

Creating a Mesh Circle
Setting it's Vertices = 16
and Fill = Ngon

Then in the Text editor window selecting

Templates - Python - Bmesh Simple Editmode

and adding a 6 lines of code, all the rest was in the template

# This example assumes we have a mesh object in edit-mode

import bpy
import bmesh

# Get the active mesh
obj = bpy.context.edit_object
me = obj.data


# Get a BMesh representation
bm = bmesh.from_edit_mesh(me)

bm.faces.active = None

# Modify the BMesh, can do anything here...
i = 0
for v in bm.verts:
    if ( i % 2) :
        v.select = True
    else :
        v.select = False
    i=i+1


# Show the updates in the viewport
# and recalculate n-gon tessellation.
bmesh.update_edit_mesh(me, True)


My code being


i = 0

    if ( i % 2) :
        v.select = True
    else :
        v.select = False
    i=i+1


Which just selects every other vertex based on the remainder when divided by 2

set of blender screenshots showing how my python script created a nice Sun shape from a circle

That worked how I wanted but then I found Blender has "Checker Deselect" in the Select menu that deselects every other vertex and produces the same result. Same code?
Not quite. On a UV Sphere my code creates this pattern.
set of blender screenshots showing how my python script affects a UV sphere
(note that on each Ring two selected vertices are always together somewhere)

Where as the "Checker Deselect" selected each Ring and ends up like this.
set of blender screenshots showing how the Checker Deselect affects a UV sphere

Finally I took an ICO Sphere, used my selection script, did a Extrude Individual plus Scale and ended up with a odd hairy object. Then added a Skin Modifier to convert the "Hairs" into fingers and a Subsurface Modifier to smooth them all out. Then playing in the compositor I got this.
abstract blender render created from extruding vertices

Oh, and you can change the script where it says bm.verts to bm.faces to select every other face.
09 Oct 2017:
ethernet connector for pi
Raspberry Pi 3 HiRes
(home straight)

[X]Board in Blender
-[X]Measure board
-[X]Model
-[X]Texture
-[X]Components on the bottom
-[ ]Components on the top
--[X]GPIO pins
--[X]Camera connector
--[X]Display connector (identical to the camera connector)
--[X]Broadcom chip
--[X]Other chip (networking and USB, I think)
--[X]USB power connector
--[X]HDMI connector
--[X]Headphone jack
--[X]Ethernet connector
--[ ]USB connector pair x2 (making four)
--[ ]Micro components, like capacitors (loads of these)

Ethernet connector was a nice collection of Mirror Modifier, Bevel Modifier and Solidify Modifier. I also added a material to the side faces that is the logo as a mask for the metal roughness.

rendering of raspberry pi circuit board highlighting the ethernet connector and its logo
09 Oct 2017:
blending up a reverse build glare world
The problem with Blender is the shiny factor.

It was just too easy to;

Delete the default Cube
Add a UV Sphere with Segments=128 Rings=64 and Generate UV's ticked
Switch to Cycles
Move the Point lamp into the Sphere and increase the strength
Add a Material and select a Equirectangular map of the world
Add a Build Modifier with Reverse ticked
Add a Cube and scale it to encompass the scene (later found could do without this and just use the Background Nodes)
Set the Volume to be a Mix node of Volumetric Scatter and Volumetric Absorption
Add a Glare Filter in the Compositor(never played in the Compositor before)
Render, render, render
Play in VSE to edit the video.


Had some problems, in that the videos produced by Blender do not load into Blender very well. Adding a Speed Affect worked for most cases, but to do the split screen x4 I had to manually convert the videos to force the frame rate.

Adding Movie Strips with a Speed affect AND a transform AND repeating it 4 times really screwed things up.

And back to the "It was just too easy to" it also took bloody ages as I made numerous costly(time) mistakes.

I have some actual homework related Blendering to do and I have added the Ethernet port to the Pi, so expect those soon.
loading results, please wait loading animateloading animateloading animate
[More tags]
rss feed

email

root

flog archives


Disclaimer: This page is by me for me, if you are not me then please be aware of the following
I am not responsible for anything that works or does not work including files and pages made available at www.jumpstation.co.uk I am also not responsible for any information(or what you or others do with it) available at www.jumpstation.co.uk In fact I'm not responsible for anything ever, so there!

[Pay4Foss banner long]