Life is strange. The little side project that was shown to Her Royal Highness back in 2016 was required again last week.
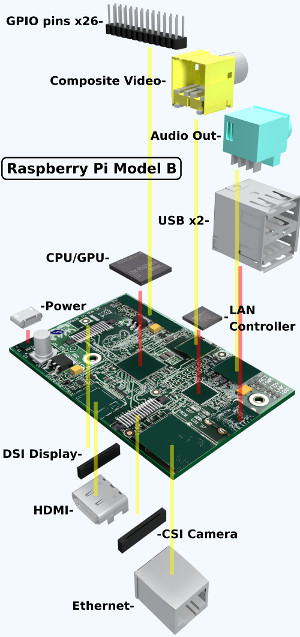
My Raspberry Pi Model B VR game was used at an event called Teen Tech. Encouraging youngster so to look at STEM careers.
(same video)
What was interesting was that each teenager(and one teacher) were very engaged when in VR, but their class mates who were waiting(and most teachers) were completely ambivalent. Some using their phones or chatting. We tried to get some camaraderie going, but it did not work as well as you would think in most cases.
I had printed out some useful information sheets about VR, how it worked, what it could be used for, why we get motion sick, what the future of VR was and a few other bits. Only one teacher tried to get her class to look at them.
We had a range of confidence levels from the participants. From "I have down all the VR games before" to "AGHHHhhh!". The first one was impressed surprised how much more immersive the HTC Vive compared to more basic VR. The second one was terrified of the initial experience, but we got them enjoying it and having fun by the end. We also had to deal with "dancers" and "lungers". With limited space and only myself and one other we had to stop people jumping and striding from one end of the space to other and banging into walls.
FYI, I did not get hit in the face, but my colleague did. :) Too slow.
This was all done as a bit of CSR Corporate Social Responsibility. E.g. Giving back to the community.
If this continues, I think I would like to revisit a number of aspects about the experience.
Two main ones are to do with visibility. I had already added a way to make the Pi go up and down to accommodate shorter users, but it is difficult to use and a better way would be for the operator to make slight changes from the laptop running the the game. Currently interacting with the buttons causes large changes and the Pi ends up on the floor.
Speaking of the floor, the flat grey chips are sometimes hard to see on the floor as they look like odd shadows, especially from a distance.
We were lucky to have a very stable floor and the only time the alignment got out of whack was when a tripod holding one of the HTC lighthouse got nudged ever so slightly. Unfortunately this meant the virtual floor was below the physical floor and thin items could not be picked up.
I could fix this with a larger bounding box. On the subject of bounding boxes, I could make them glow and increase in brightness as the game plays out. One of the items seems to have a hit area of only the edges and people kept trying to pick it up from it's centre of mass, where it is empty and failing.
Finally one last issue to fix, that I had not seen as such as an issue as before in teleport distance. More than once, a participant managed to teleport through a window when they first started and then had difficulty getting back. Previously the walls stopped this, not sure why it was being bypassed so easily. Coding a hard edge would be easy.
One little demo to test how the Unity system worked has lead all this way :)
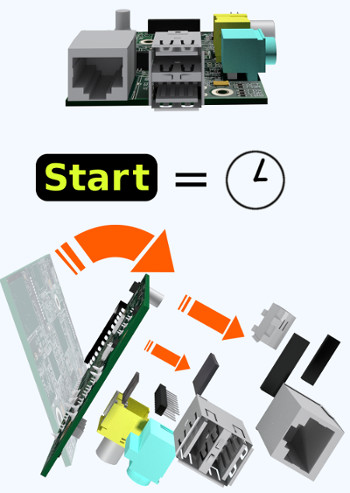
Here are the posters from the game and show how it all works.
How to get back to my Master branch I was previously working on.
git checkout master and you can use
git status to check which branch you are currently on at anytime.
I have a second hand, reconditioned HP Pavilion DV2000 laptop, that I use for Linux testing and it is slooooow.
Did not want to invest in an SSD, so I looked into upgrading the memory. HP's site reports this model comes as 1GB, upgradable to a maximum of 2GB.
In Ubuntu I run
free -g and get back 1
Quick Amazon search and I have ordered a new 1GB(very specific model) Dimm(Direct Inline Memory Module) £7.88(INC. P&P and VAT). 24hrs later I have it in my hand.
Open up the laptop(has nice easy access to the Dimm bay) and ...
There are two Dimms ... maybe they are 512MB each?
Nope both are 1GB.
Boot into BIOS, 1024MB ????
Re-seat memory Boot into BIOS, 2048MB, phew!
Back into Ubuntu ...
free -g and get back 1
uh oh
free -m and get back 1984
erm, so it would have never shown 2GB?
exactly the same with sudo
Now I need to go on a crusade to find out why Linux is reporting 2GB RAM as 1984MB
is it GB, Gb, gb GiB ?
sudo lswh -c memory clearly shows two slots each with 1GiB
I was interested in finding out how the settings for the Blender perspective camera work. So I created these nine videos looking at
sensor size at 16 varying the focal length
sensor size at 32 varying the focal length
sensor size at 64 varying the focal length
sensor size at 100 varying the focal length
focal length at 1 varying the sensor size
focal length at 35 varying the sensor size
focal length at 64 varying the sensor size
focal length at 150 varying the sensor size
focal length at 250 varying the sensor size
Which produces these interesting and quite varied zooming affects, reminiscent of early film making special effects.
Disclaimer:
This page is by me for me, if you are not me then please be aware of the following

I am not responsible for anything that works or does not work including files and pages made available at www.jumpstation.co.uk
I am also not responsible for any information(or what you or others do with it) available at www.jumpstation.co.uk

In fact I'm not responsible for anything ever, so there!