f-log

just another web log

25 Apr 2021:
seeing the wrong print on an ender
Some of the failed prints left a clear foot print of destruction. From a 5mmx20mm base you could clearly see where the print was good and which corner was bad. If there was bubbling then the bed was too low, where there was smudging the bed was too high.

As well as trying the 3D Benchy print I want to try something that requires supports. That is a model that would fall over if there was not something else propping it up.

I am really impressed with the Ender 3 v2 and from looking around it does seem to be the one most people recommend for a sub £200 3D printer.

The filament costs around £20 and the way I am using it means it will be a while before I need any more.
25 Apr 2021:
start to finish evolution of a 3d printed webcam cover
OK so it took 5 iterations, but I now have my custom 3D printed webcam cover.
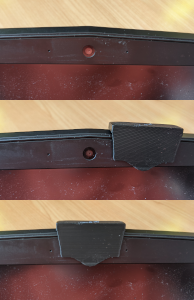
3D printed webcam cover, uninstalled, installed and open and closed
fits nicely

3D webcam cover in PrusaSlicer 3D view
in PrusaSlicer

3D webcam cover in PrusaSlicer, sliced, partial
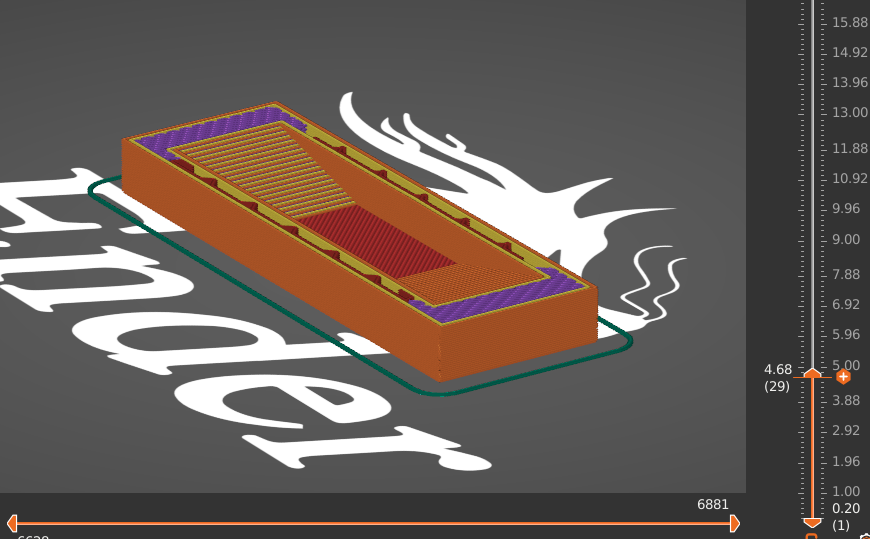
in PrusaSlicer, sliced and showing the early layers with internal structure

3D webcam cover iterations x5
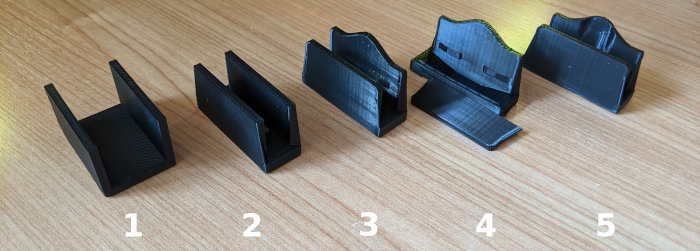
Evolution of a 3D webcam cover


1: Incredibly simple model.
Designed in Blender with the goal of getting something, anything to print.
Slicer: PrusaSlicer 2.3.0 (Linux)
Printer: Ender 3 v2
Quality: 0.2mm
Time: 54mins
Result: POC print

2: Shrunk the width to better fit laptop lid.
Started reshaping to include ramps, as the laptop lid is not flat.
Slicer: PrusaSlicer 2.3.0 (Linux)
Printer: Ender 3 v2
Quality: 0.24mm
Time: 50mins
Result: Iteration for manual fitting

3: Added lens cap extension.
Although No. 2 did cover the lens completely a design decision was made to extend a lip for aesthetic reasons. The inside included a new ridge to better clip on to the target lid.
Slicer: PrusaSlicer 2.3.0 (Linux)
Printer: Ender 3 v2
Quality: 0.28mm
Time: 42mins
Result: Iteration for manual fitting

4: Shrunk width for tighter fit.
This version was shrunk by 10% across the width, but was ultimately too tight to fit the target. Basic attempts to bend the the cover to bit fit resulted in the catastrophic failure of the piece.
Adaptations to the ridge structure internally opted for a split design closer to the edge.
Slicer: PrusaSlicer 2.3.0 (Linux)
Printer: Ender 3 v2
Quality: 0.28mm
Time: 42mins
Result: Iteration. Failed due to manual stress.

5: Enlarged and then tweaked.
Lens cover was made concave. Installation complete. Fits perfectly. Note: the laptop lid was not uniformly thick and sliding from the corner was required make good contact.
Slicer: PrusaSlicer 2.3.0 (Linux)
Printer: Ender 3 v2
Quality: 0.24mm
Time: 49mins
Result: Finished print

This does not include all the failed prints. Of which there were many.
The resolution was to tighten the horizontal drive belt and re-level the bed over and over again. In one case I did not attempt to stop a failed print and it went on to create a reasonable results that require minimal clean up at the end.

Changing the quality of the print did not affect the print time drastically and for it's intended purpose I will not bother print this again at a higher quality.

Next I want to print a 3D Benchy stress test model.


22 Apr 2021:
print fail fail and partial success
Printing the default puppy model had been so easy and straight forward I felt I could print anything!

Bit of quick Blendering and I had a laptop webcam cover. Only, it would not import at a reasonable size. I was pretty sure I had followed the rules about setting the Units to 0.001 and applying my scale, but everything I tried led to errors in PrusaSlicer.
It would pop up a warning that the model appears to be in Inches not mm and saying Yes or No to converting it resulted in a tiny model that would not slice.

I watched a few YouTube videos on the subject and decided to start from scratch and it worked, so no idea what I was doing wrong. The model was a simple three planes making a U shape and a Solidify modifier giving depth.

Print attempt No. 1: Started well and after 20 mins of watching the print head do its mesmerising thing I went to watch telly and ... Came back 30 mins later to find plastic spaghetti. FAIL
Print attempt No. 2: I wondered if the model was too small to stick to the bed, after all, the puppy had been on a 2 inch circumference base. So I doubled the length and tried again. This time all I got was spaghetti. Not a single piece of plastic was on the bed! FAIL
Got a bit despondent at this point. Decided that before I changed anything else I would just re-level the bed, even though I understood that it was not required if the printer had not been moved.
Re-levelling involves slipping a piece of paper between the print head and the bed and testing the resistance. There should be obvious friction without trapping the paper. I gave it some very minor tweaks and thought about how little it would cost to try another print.
Print attempt No. 3: Printed without issue and I now have block of plastic in the shape I modelled. I found it very interesting that the resulting physical item has no horizontal lines and this print was set to Optimal. What would I have got from High Detail or Super Detail?

The part was too big to work as a webcam cover. But that is fine, as I just wanted to print something successfully. I have remodelled it and will try a Normal(one less than Optimal) print tomorrow. I am not leaving this on over night.

20 Apr 2021:
random 3d printer
So it is time to forget the Oculus Quest 2 and focus on ... 3D printing!

Life is so random. I now have access to a Ender 3 v2 3D printer. Which seems to be one of the best budget 3D printers.

So far I have built the thing, that took a while and reviewing a YouTube channel for reference. The printed manual is full of technical jargon, but at the end of putting it all together you find there is a video tutorial included on the SD card.

First print was a failure. I didn't think you had to keep the clips on the base and it wondered taking the print filament with it.

Second print was a success. Took almost 2 hours, but I now have a inch high puppy on a base. This was the example model include in the root of the SD card. There seem to be some other models hidden in sub folders.

Of course I want to print something I have modelled. Just installing the slicer now ... (to be continued)
13 Apr 2021:
secret oculus quest 2 games lab
The Oculus Quest 2 is curse and blessing. Pick up and play, sell your soul to Zuckerburg!

I have found the headset is not comfortable and this seems to be a common theme amongst reviewers. The display is not super clear and the way you wear the headset can ruin the sharpness of the visuals when moved 1mm.

But, the PRICE! It is so cheap and if you are willing to hunt around there is a lot of high quality free content.

There is a set of hidden games on the Oculus store that are pre-approval. Not necessarily free, but, most are. To get to them open the Oculus Browser in the headset and search for the web address
https://applab.games/

Then any game listed can be installed directly by following the link and making sure you are logged in. I had to allow Oculus permission to connect to Facebook.

One of the Games I tried was "Puzzling Places Beta" which is just a 3D jigsaw puzzle experience. But, it is so good. Really well done and very relaxing. Also, get very hard. From 20 pieces to 100 and then 200.

03 Apr 2021:
only five years to get over vr sickness
After almost five years I am now VR ready. Nothing to do with having new hardware, I mean I can finally stomach moving in VR.

I had totally avoided any VR experiences on the Vive that didn't involve teleporting and the Vive supported this wholeheartedly. Any game/experience that had sliding motion also had teleporting, usually as the default.
The feeling of the world around you sliding past you (think virtual roller coaster) mad me very queasy, very quickly and then it could take many hours to recover.

The Oculus Quest 2 on the hand expects many games and experiences to be slide to move and not teleport. It also offers lots of "Google cardboard videos" which track the rotation of your headset but no movement. When you rotate your head the pivot point is not in the center of the headset and this setup also used to make me want to hurl.
I kept reading that everyone who had the same response as me just powered through it, so instead of giving up I tried to find a good VR experience that I could gradually train myself in.

There was a free app on the Quest from NASA allowing you to explore the ISS (International Space Station) and complete mini missions. I knew it would be rough due to all the floating around, but I found that the design of the space station also meant I could grab a rail at almost anytime and arrest my motion.

The ISS experiences is a lot of fun and there are a number of support videos with astronauts describing life and work. These along with the mini missions and space walk allowed me to try out floating in VR in short bursts where I felt in control at all time.

Eventually I had reviewed all the videos and completed all the missions and was ready for something new. The kids had bought Population:One which is a battle royal game in the fortnite vein. Needless to say, you need to slide to move around, there is also some flying and tiny amount of falling. It was not perfect, but I manged to stay in the game until dead and then used the spectator mode to fly above the battle field. I needed rest afterwards and felt a bit "off". Nothing like the dizzy and sick feelings I would have had previously.

I still find a hour of intensive VR play quite draining, but I can jump back in after some hydration!
loading results, please wait loading animateloading animateloading animate
[More tags]
rss feed

email

root

flog archives


Disclaimer: This page is by me for me, if you are not me then please be aware of the following
I am not responsible for anything that works or does not work including files and pages made available at www.jumpstation.co.uk I am also not responsible for any information(or what you or others do with it) available at www.jumpstation.co.uk In fact I'm not responsible for anything ever, so there!